Main
How to Retile your Shower in 5 Steps
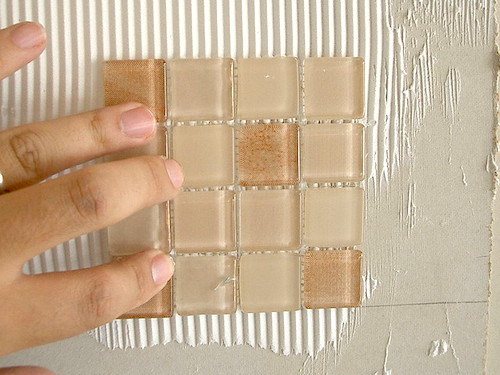
Image courtesy of Vincent Ma/Flickr.
Retiling your shower can make a major statement in your bathroom. It can take it from dull and boring to new and interesting and the right tile job can make the entire room feel luxurious and serene. Adding new tile to your shower isn’t as hard as you may think and it’s a great DIY project you can do over a weekend.
If you plan on altering your plumbing or installing new fixtures, contact us. We are Seaford plumbers that can help you remodel your bathroom and update it safely and quickly.
Step 1: Remove the Old Tile
First, remove the existing tile in your shower by laying an old towel or drop cloth over the tile and using a small sledgehammer to break it up. To do this on the walls, use heavy tape to hold the sheet up and work in small sections, starting at the bottom. Then, use a scraper or power scraper to remove all the tile and old adhesive. You want the surfaces to be as smooth as possible. Wear gloves and safety goggles while you do this step.
Step 2: Plan Your Design
One of the best parts of doing this project yourself is that you get to create a custom design for your shower. Use graph paper to make a sketch of what you want your shower to look like and then calculate how many tiles of each kind you’ll need. Get creative and use solid, patterned, textured and tiles of various sizes to make a statement with your shower.
Step 3: Lay Adhesive
Start by using a trowel to lay adhesive as directed by the manufacturer. Generally, you will want to use a trowel with grooves so the tile will adhere more strongly to the wall. Don’t use so much adhesive that it will come up between the tiles, but use enough so that each piece will be secure. Start at the center of the shower or floor and work your way out in small sections.
Step 4: Install the Tile
Firmly press each tile into the adhesive using a level if you need to to make sure they are perfectly straight. Work in small sections so that the adhesive doesn’t dry before you get to it. Use tile spacers as you go so the spaces between tiles will be uniform.
Step 5: Apply Grout
Once all the tiles are in place, let them set as directed by the instructions that came with the adhesive. Then, use a grout float to apply grout in wide, diagonal movements. Before it dries, use a damp sponge to wipe excess grout from the surface of the tiles.
Let the adhesive and grout dry completely before you use the shower. This project is one you can do in just a few afternoons and drastically changes the way your bathroom looks. If you need assistance installing appliances or altering your plumbing, contact us. We’re Seaford plumbers that specialize in bathroom remodels.
Quick Service Request


Follow Us On