Main
How to Install Your Own Backsplash
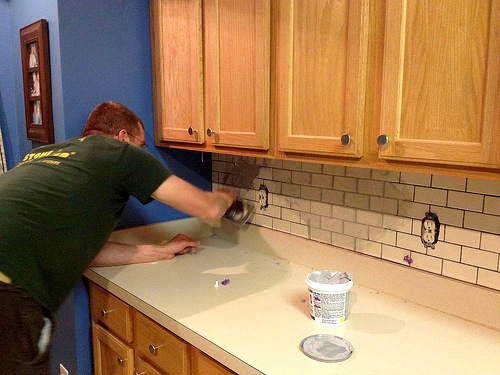
Image courtesy of Shannon Smith/Flickr.
Does your kitchen need some color? Adding a backsplash is a great way to create some interest and add color while also bringing more utility to your kitchen. A backsplash will protect the wall behind your sick and counter from inevitable splashes, so clean up will be a breeze. With some tile, adhesive and grout you can add a custom backsplash to your kitchen in just one weekend.
Prepare the Wall and Arrange Your Pattern
First, make sure the wall behind your sink is sturdy enough to hold tiles. Also make sure it is clean, smooth and dry and that all outlet covers have been removed. If the wall is consistently damp, there may be a leak behind the wall. We are a plumber on Long Island that specializes in leak detection and repair, so contact us to repair plumbing leaks before you install a backsplash.
Then, arrange the tiles in any pattern you want. You can buy tiles in all shapes, sizes and colors, so the possibilities are endless. You can go for a retro look, a classic look or a basic one-color backsplash. Be sure to buy a few extra tiles just in case some get scratched or chipped.
Apply Adhesive and Start in the Center
Use a trowel to apply adhesive to the wall and then place the first vertical row of tiles in the center of the backsplash, or so that they are lined up with the center of your sink. This technique will help you ensure the backsplash is centered and straight. In order to apply the tiles and design correctly, it is very important that you have thought out and designed the pattern in step one.
When you apply tiles to the wall, use a twisting motion to push them against the wall. You should also use a level to make sure each tile is perfectly straight before you add the next one. If you need to cut tiles to make them fit on your wall or around things like outlets, measure carefully and then score along the back of the tile. You can use a tile saw or nippers to cut them to the right size.
Add Grout
Once all the tiles have been applied, use a damp cloth to remove any adhesive on the top or edges of the tiles. Then, let the tiles set according to the directions on the adhesive. Every grout manufacturer includes mixing instructions that need to be followed exactly, so be sure to read them carefully. Use a rubber float to spread the grout over the tiles at an angle, pushing it into the spaces between tiles as you work. Use a damp rag to remove extra grout. As the grout begins to dry, run a round stick through the gaps between the tiles to shape the grout.
After you have installed the backsplash, let it dry completely before you reinstall outlet covers and begin using the backsplash. What are you waiting for? Start designing your custom backsplash today and by the time the weekend rolls around, you’ll be ready to get started! If you are interested in making bigger changes in your kitchen, contact us. We are a plumber on Long Island that does kitchen remodels.
Quick Service Request


Follow Us On